Zebra-Striped Matcha Shortbread Cookies
This post may contain affiliate links. Please read my disclosure policy for details.
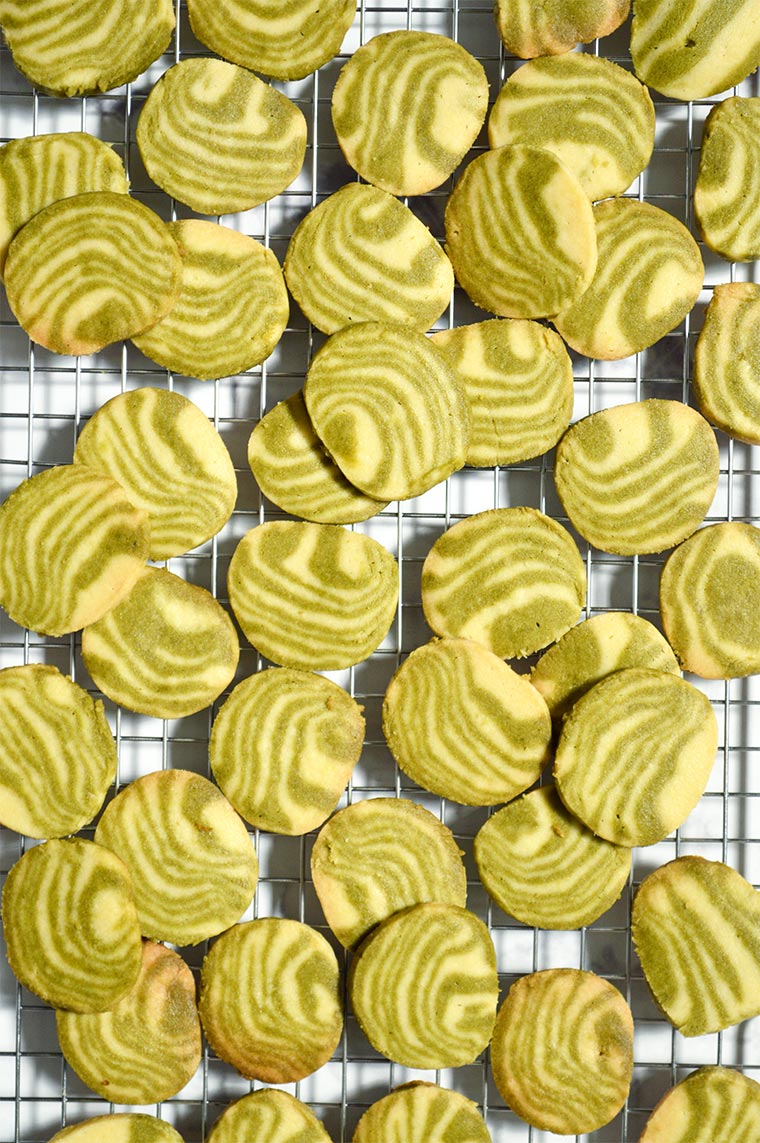
Delightful Zebra-Striped Matcha Shortbread Cookies made with only 6 ingredients. They are easier to make than they look and totally worth the effort.

Do you still remember my previous Zebra-Striped Shortbread Cookies? These Zebra-Striped Matcha Shortbread Cookies are the matcha version of those cookies. This time, I used matcha cookie dough instead of chocolate dough for these cookies and alternated the layers with vanilla cookie dough.
It looks complicated, but trust me it is much easier than you think to pull off. You don’t need any rolling at all. The layers and shapes are all created by hand. They are made into a log and when you are ready to bake, you just need to slice it into thin layers with a knife.
How to Make the Striped Pattern
You start by making the basic vanilla and matcha shortbread cookie dough. I already have my ideal ratio from my previous Matcha Shortbread Cookies. After you have made both flavors, it is time to layer them.
To do this, I divide each dough into two and stack them into 4 alternating layers. Press them gently but not evenly or your zebra pattern will be too neat. Then, cut vertically in the middle. Put one part overlay the other. Not you have 8 alternating layers.
Press, cut, and stack the dough again until you get 16 alternating layers. Press and roll the dough into a log. Cover with parchment paper or plastic wrap and chill until the dough is firm for at least 2 hours.
When ready to bake, cut the log into thin slices about 1/8 to 1/4-inch or about 3-5 mm. Put them into a prepared baking pan and bake until the edges turn light brown. Transfer them to a cooling rack immediately.

The Best Flour to Make Shortbread Cookies
You can use both all-purpose or cake flour for shortbread cookies. I personally like to use cake flour because it gives light, crisp, and tender textures to the cookies. If you use all-purpose flour, I find them softer and chewier than the ones made with cake flour.
If you don’t have cake flour but still want these lighter cookies, try converting from all-purpose flour to cake flour. Take one cup of all-purpose flour, spooned, and leveled. Remove 2 tablespoons, and then add two tablespoons of cornstarch to the all-purpose flour.
Pro Tips
- Crumbly dough. After adding the flour, the dough will look crumbly at first. You need to work it with a spatula more until the dough is well incorporated. Make sure to use softened room temperature butter because you will need to work on it longer if using cold butter.
- Refrigerate the dough after mixing. If your dough is too soft or sticky to touch, refrigerate it for 20-30 minutes. The dough should be like a play-doh texture and not too soft and not too hard so that you can easily stack the layers and shape them into a log. Don’t leave it in the refrigerator too long or it will be too hard and the dough will not stick to each other when you stack them.
- Stacking the layers. It is best to use your hands to flatten the dough because the layers will be too neat if using a rolling pin. Try shaping the layers into a rectangle as much as possible after each cut and stacking so that you will get the same amount of layers on each slice.
- Shaping the log. Place cookie dough in the center of a large piece of parchment paper and use your hands to shape it into a rough log. Fold parchment in half over dough. Grasp the bottom half of the parchment. With your other hand, press a bench scraper or a ruler into a crease that forms between dough and parchment. Then, move the scraper back and forth along the length of the dough to even out the cylinder. Roll parchment into a cylinder and firmly twist ends together to form a tight seal.

Make These Cookies in Advance
These Zebra-Striped Matcha Shortbread Cookies can be made several days in advance. After you make the cookie log, you can refrigerate it, covered, for up to 3 days prior to baking.
If you are making shortbread dough longer than 3 days ahead of time, it is best to freeze it. You can simply place the cookie log in an airtight container and freeze up to three months. Thaw it the night before in the fridge, then slice and bake the dough as directed.

More Matcha Recipes
If you don’t know, I have tons of matcha dessert recipes on my blog. Here are some of them:
- Poured Matcha Tiramisu
- Matcha Cupcakes with Whipped Matcha White Chocolate Ganache
- Matcha Tres Leches Cake
- Almond White Chocolate Matcha Cookies
- Eggless Matcha Tiramisu Cake
- Matcha Panna Cotta

Ingredients
- 1 cup (225 gr) unsalted butter
- 3/4 cup (90 gr) confectioners’ sugar
- 1/2 tsp vanilla extract
- 1/2 tsp salt
- 2 1/4 cups (285 gr) cake flour/all-purpose flour
- 1 1/2 tbsp matcha powder
Instructions
Make The Cookie Dough
- Using a hand mixer or stand mixer fitted with a paddle attachment, cream together butter, sugar, and vanilla extract, until well incorporated.
- Sift in the flour and salt. Mix until the dough starts to come together with a spatula. The dough will look crumbly at first, but it will come together as you continue mixing.
- Divide the dough into 2 bowls evenly. Sift in matcha powder into a bowl and mix until well combined with a spatula.
- If the dough is too sticky to handle, refrigerate it for 20 minutes until just a little bit firmer.
Assemble
- Take half of the vanilla cookie dough and flatten it with your hand into a rough 6×3-inch/15×7.5 cm rectangle. Put the flattened dough onto a floured work surface. Take half of the matcha cookie dough and flatten it again into the same size rectangle. Put the flattened matcha cookie dough on top of the flattened vanilla cookie dough. Repeat the entire process so you have 4 alternating layers. (See the video for the visual guide)
- Cut the layered dough vertically in the middle with a sharp knife. Then, put one part overlay the other. Press and pat the dough into a rough 6×3-inch/15×7.5 cm rectangle. Cut vertically in the middle and stack the dough again. Press the dough into a log about 1.6-inch/4cm wide in diameter. (See the video for the visual guide)
- Wrap the dough with parchment paper or plastic wrap. If the dough is too long, you can divide it into two and wrap them individually. Chill until very firm for at least 2 hours.
Bake
- Preheat oven to 350F/180°C and line two baking pans with parchment paper.
- Slice the log into a 1/8 to 1/4-inch or about 3-5mm thick with a sharp knife. Arrange the slices on the baking pan, spacing 1.5-inch apart.
- Bake for 13-15 minutes or until the bottom edges of the cookies are golden brown in color. Rotate the baking sheets halfway through for even baking.
- Transfer to a wire sheet to cool completely.


I made these twice using Raspberry powder instead of chocolate or matcha because I had some on hand. 1st time they were a bit pale but the raspberry flavour came through; so 2nd time I added gel food colouring.
Delightfully crispy; glad you incorporated cake flour in your recipe (I used flour and cornflour mix) which I used in the 2nd recipe.
Lovely for gifts esp for kids
So easy and love how beautiful they are. Thank you so much for the recipe!
Omg I just tried these. It’s so easy to make and tastes amazing!