Vanilla Genoise Cake
This post may contain affiliate links. Please read my disclosure policy for details.
Learn how to make a deliciously light and delicious vanilla genoise cake, a perfect cake base for any desserts, with some helpful tips.

There are a lot of different kinds of vanilla cake to sample, but you can basically divide them into two categories; foam and butter. Foam cakes have a light and fluffy texture from air beaten into the eggs. Meanwhile, butter cakes depend on using chemical leavening such as baking soda and baking powder to rise. They also contain significant quantities of butter or fat which results in dense and moist cakes.
Unlike the western butter layer cakes, I grew up eating light, soft, and fluffy cakes. Mainstream western cakes tend to be overly sweet, dense, and too heavy for me. For taste and health reasons, I usually choose foam cakes because they use very little fat. Foam cakes are generally fairly lean cakes, getting most of their fat from eggs, but some recipes also add in melted butter like this genoise cake.
What I love about genoise cake is the added fat from melted butter brings a slightly longer shelf life as well as making the cake moister and tastier than sponge cake. It is firm, sturdy, and does not crumble or fall apart easily. This makes genoise cake a good foundation for cake both in terms of taste and the assembling process. The airy but sturdy structure makes it ideal for adding syrup drizzles. The cake is also great with colorful jams and curds for fillings, or with mousses, buttercream, whipped cream, and more.
I began to love making smaller cakes, especially when you are living with a small family. Small 6-inch cake pans are the perfect size for me. But if you are not into 6-inch cakes, you can also multiply the batter into bigger size pans.
About Genoise Cake
Genoise cake or also known as Genoese cake or Genovese cake is an Italian sponge cake that is much associated with Italian and French cuisine. It is a simple sponge cake made with eggs, sugar, flour, and a little bit of fat. Instead of using chemical leavening, the air is suspended in the batter during egg mixing to provide the volume. Unlike some other sponge cakes for which yolks and whites are beaten separately, the whole eggs are beaten with sugar and using the bain-marie method until the ribbon stage for genoise cake.
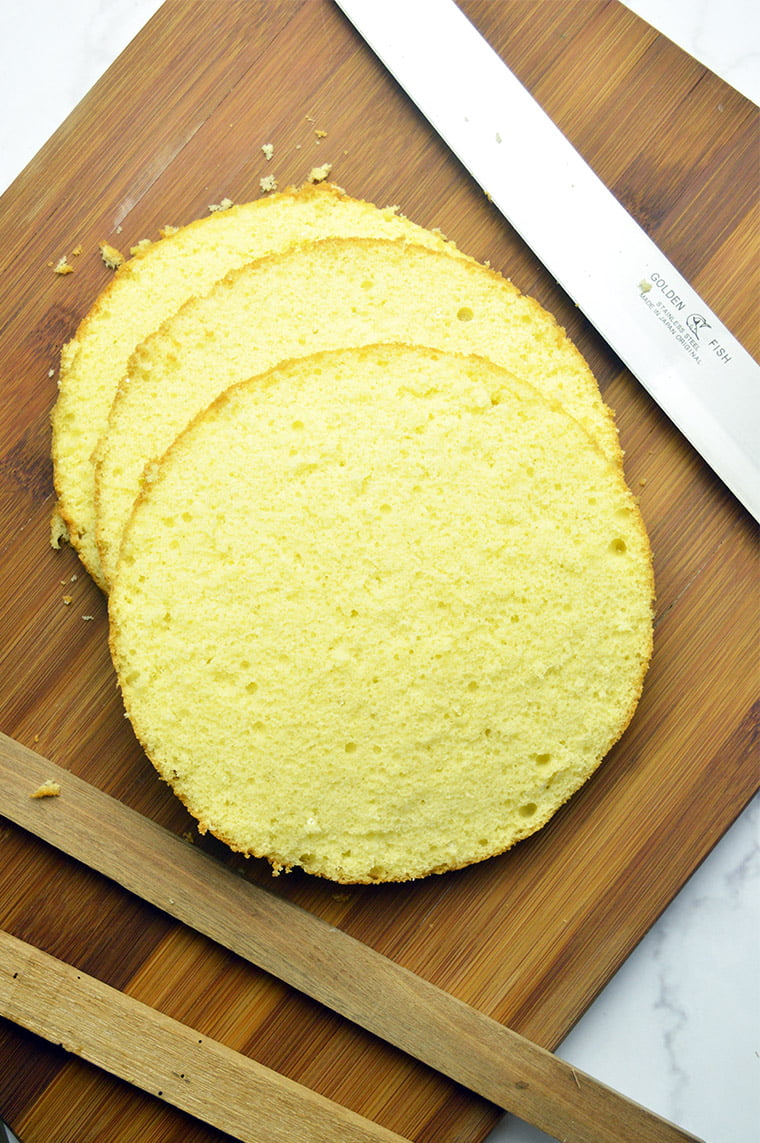
The beauty of sponge cakes, and especially genoises, are that they are very versatile. You can serve genoise cake as a cake itself or cut into thin layers to form the base of cakes. Genoise cake tends to be dry, so the cakes are often cut or baked in large, thin layers so that they can readily absorb flavored sugar syrups or liqueurs, without becoming too wet and losing their delicate texture. That is why the cake compliments moist fillings, like mousse or pastry cream. It also tastes great with creamy and smooth buttercream.
Sponge vs Genoise Cake
While the sponge cake and genoise cake are often regarded as being one and the same, they are actually very different. Sponge cake contains no fat other than that occurring naturally in egg yolks, and the yolks and whites are usually beaten separately. With genoise, butter is used to enrich the batter. The cake is made by beating whole eggs together with sugar, over warm water until the sugar is no longer grainy and the mixture is light.
Due to the added fat to the batter, genoise cake ends up with a more tender, flavorful crumb than many other types of sponge cake. It also tastes less sweet than other sponge cakes. The cake is also firmer and studier, perfect for making layers cake because it holds the structure.

How to Make Genoise Cake
Let me guide you step-by-step on how to make a light and delicious genoise cake.
1. Get everything ready
Let’s start making genoise cake by preparing all the ingredients first before starting to make the actual cake. Always heat the oven first as to not let the batter sit out too long on the counter.
2. Warm the eggs and sugar mixture
This step is called the warm foaming method. For warm foaming, you whisk your eggs and sugar together over a hot bath until the temperature of your eggs hit 104°F/40°C. Make sure the bottom of the bowl does not touch the water. The main purpose of this step is to dissolve the sugar and improve the emulsifying properties of the eggs. As a result, it helps them reach maximum volume when beaten.
I like to use castor sugar for this because it dissolves faster than granulated sugar. It is important because if the sugar is not dissolved all the way, the egg structure needed for the ribboning stage won’t be done correctly.

3. Whip the eggs mixture
After the temperature is reached, transfer it over to an electric mixer and beat it up until it hits maximum volume until the mixture has lightened in color and the foam has reached its maximum volume. This process is what will create your cake rise without using any leavening agents. It may take about 5-8 minutes, but do not rely on time. Instead, use a visual clue called the ribbon stage to recognize when you are done.
The ribbon stage specifically refers to the thick, pale, foam-like batter created when eggs and sugar are beaten together. To ensure the batter is properly whipped, the batter should fall in ribbons. When you lift the mixer from the mixture, the batter should fall back in thick trails. The ribbon lines will stay suspended on top of the batter, remaining clearly visible on the surface for a few moments before slowly disappearing. You can also try to lift the mixer and draw an “8” on the batter. If the eight stays for 4-5 seconds, you’ve reached the ribbon stage and the batter is ready.

4. Fold the flour and butter
Next, the cake flour is carefully folded into the whipped egg mixture a little at a time. Do not dump the flour mixture all at once into the batter or you will risk deflation. Folding helps to prevent the foam from deflating. Scrap from the bottom to the top. Do this just until the flour is combined.
In genoise cake, a little fat is added for a richer cake. I use butter for the fat. In this case, we want to completely melt the butter, but then allow it to cool to room temperature so it is not too hot. Meting the butter ensures it is fully incorporated and allows the fat to coat the gluten strands so they do not form a network that is too strong. This helps deliver a nice, soft crumb and adds more flavor to the cake.
But if you add the melted butter directly into the batter, it tends to sink to the bottom of the batter and it will be harder to fold. So, adding a little bit of batter into the melted butter, mix, and pour them back into the batter will make sure it is easier to incorporate without mixing the batter too much. In a small bowl, combine melted butter, milk, and vanilla extract. Add a scoop of the batter into the melted butter mixture and mix until well combined. Pour the combined mixture into the egg mixture and fold the batter again until well incorporated.
5. Bake immediately
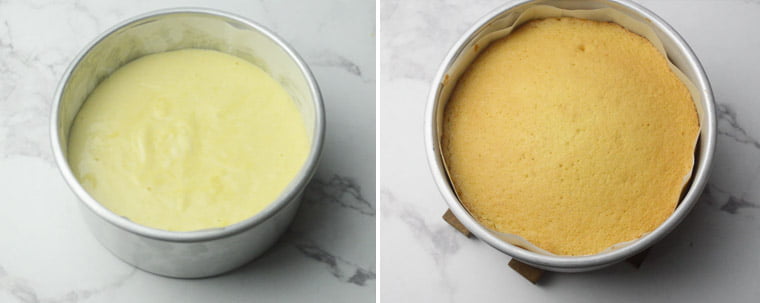
After the batter is ready, pour it into the prepared 6-inch cake pan![]() . Level the top with the spatula. Tap the pan 4-5 times on the counter to remove the air bubbles and bake immediately at 340°F/170°C. The cake will be ready after baking for about 30-40 minutes. You will know it is ready when the top is golden brown and when a skewer inserted into the cake comes out clean.
. Level the top with the spatula. Tap the pan 4-5 times on the counter to remove the air bubbles and bake immediately at 340°F/170°C. The cake will be ready after baking for about 30-40 minutes. You will know it is ready when the top is golden brown and when a skewer inserted into the cake comes out clean.
6. Drop and cool the cake
After the cake is out from the oven, immediately drop the cake on the floor from about one foot height. This helps prevent it from shrinking in the middle. Cool in the tin for 10 minutes before turning out on a wire rack. Then, remove the cake from the pan by placing a wire rack on top and flip it over. Then, flip it over again with another wire rack. Let the cake cool completely before using. Cover with a damp kitchen towel during the cooling process to prevent it from drying out. Remove the parchment paper when you are ready to use it.
Tips for Making Genoise Cake
Because genoise lacks the extra push of leavening, it can be tricky to achieve the proper lift and texture. It’s not uncommon for bakers to open the oven and find a flat and dense cake. Here are some helpful tips for achieving the perfect genoise cake.
1. Temperature matters
It is best to start with room temperature eggs and melted butter. Room temperature eggs trap air better than those that are cold, meaning you will wind up more volume in your batter and fluffier texture in your baked cake. Warm eggs also ensure the fat, in this case, butter does not become shocked and clump. If you need to bring your eggs to room temperature in no time, try placing cold eggs in a bowl of very hot water for about 5 minutes while you measure out the rest of your ingredients.
When beating together the eggs and sugar over a bain-marie, be careful not to heat the mixture too much. You only want the batter to be warm to the touch, so this will help dissolve the sugar and will speed up the mixing process. Too hot and you will scramble our eggs.
2. Do not overmix
We put all the effort to beat the eggs and sugar to incorporate air as much as possible into the cake. This is what gives the cake its height and airy crumb. But if you overmix the batter, you will deflate all the air you have just beaten in. Make sure to fold the flour in parts. Go in a circular pattern, over and under, scraping the bottom of the bowl as you go to prevent clumps. If adding the butter, mix a scoop of the batter into the butter first before incorporating it into the batter. Then, fold just until mixed.
3. Do not open the oven door until the cake is cooked
It makes a big difference in what you are baking as to how much impact opening the door will have. A genoise cake does not have any chemical leavening agents in it. All the lift you get comes from the expansion of air and moisture from the heat of the oven. When you open the oven door, you let in cold air and lose some of your moist, hot air. At this stage during baking, the structure of the cake hasn’t set enough to hold its shape and, as the air in the cake cools and contracts momentarily due to the loss of heat, the cake will deflate. It also won’t rise again even if the oven regains the correct temperature.
Cake Recipes Made With Vanilla Genoise Cake
After all the hustle above, we are now ready to have a cake! Try making these recipes with Vanilla Genoise Cake!
Ingredients
- 3 eggs, room temperature
- 6 1/2 tbsp (85 gr) castor sugar
- 1 tsp vanilla extract
- 3/4 cup (90 gr) cake flour
- 2 tbsp (30 gr) unsalted butter, melted
- 2 tbsp (30 gr) milk
Instructions
- Preheat an oven to 340F/170°C. Grease and line the bottom and the side of a 6-inch/15 cm round pan with parchment paper.
- In a small bowl, combine melted butter and milk. Set aside.
- Whisk together the eggs and granulated sugar by hand until well combined in a mixing bowl. Place the mixing bowl over but not touching simmering water in a saucepan (bain-marie). Gently whisk the mixture by hand until the temperature of the egg mixture reaches 104F/40 ºC with a food thermometer. It should be warm to touch and the sugar should have fully dissolved at this point.
- Remove the mixing bowl from the saucepan. Whisk on high speed using a handheld or stand mixer fitted with a whisk attachment until the mixture is pale and tripled in volume for about 5-8 minutes or until it reaches the ribbon stage (lift the whisk and draw an “8” in the batter. If the eight stays for 4-5 seconds, you’ve reached the ribbon stage and the batter is ready).
- Add the vanilla and sifted flour, fold until no flour is visible with a spatula. Scrape down the sides of the bowl to ensure that everything is incorporated.
- Take out 1 scoop of the batter from the bowl to the butter and milk mixture. Mix with a spatula until well combined. We incorporate the butter into the batter first because the fat in butter will deflate the batter if we add the butter directly.
- Add the mixture back to the batter. Gently fold in until everything is well incorporated. When you lift the spatula, the batter should fold down like a ribbon.
- Pour the batter into the cake pan. Level the top with the spatula. Drop the cake pan on the counter 4-5 times to release air bubbles in the batter.
- Immediately bake the cake for 30-40 minutes in the preheated oven. You will know the cake is done when the top is golden brown and when a skewer inserted in the middle comes out clean.
- As soon as you take out the cake pan from the oven, drop it on the counter to give a shock to the cake to prevent it from shrinking. Take the cake out of the pan by placing the wire rack on top and flipping it over.
- Place another wire rack on top and flip it back. The top of the cake is now facing up. Cover the cake with a damp towel until cooled, to keep moisture in the cake. Let it cool completely. Peel the paper off the side and bottom right before using it.
- Store the cakes wrapped in plastic wrap on the counter for 2-3 days, refrigerate for 1 week or freeze for up to 1 month.
Notes
- 1 1/3 times the recipe to fit a 7-inch/18cm cake pan,
- 1 2/3 times the recipe to fit an 8-inch/20cm cake pan.
- 2 times the recipe to fit a 9-inch/22cm cake pan.


Hi
In the notes you mentioned if we want to bake 8inch we have to 1 1/3 times the recipe. How do we 1 1/3 times the recipe?
Hi Disha, use a calculator to 1 1/3 times the weight measurement. You can also 1 1/2 times the measurement for 8-inch cake, but the cake will be slightly higher.
Perfection of a cake, i did swiss buttercream, and soaked a bit with simple rum sirup soooo good! I will dbl the recipe tomorrow.
Thanks for the review 🙂
Hi. How do i adjust the ingredients for 2 x 6 inch round pan?
Hi Valerie, a recipe makes a 6-inch round cake. To make 2 x 6-inch round cake, just double the ingredients and make them altogether at once in a big bowl. Then, divide the batter into two pans equally.
Hi. Thank you for your advice.
This was wonderful. It took me two tries, but I followed the directions exactly the second time and it was perfect. Is there a way to make it chocolate. I liked the size so I’d just like to adapt this recipe
Hi Maria. Thanks for reaching me. Genoise cakes and sponge cakes are indeed those type of cakes that need precision and quick hands to make them right.
To make it chocolate, adjust the sugar and flour ratio to this amount:
90 gr sugar (1/2 cup – 2 tsp)
85 gr cake flour (1/2 cup + 1 1/2 tbsp)
10 gr cocoa powder(1 1/2 tbsp)
For me, chocolate genoise was harder to make than vanilla one because it took longer to fold the dry ingredients until well incorporated. Therefore, make sure to mix the cake flour and cocoa powder first in a bowl until well combined before you add them to the egg mixture.
Not gonna lie that I failed my first genoise cake. I think it was because I left it on the counter for too long to heat the oven. But I tried this again, read, and followed the recipe and voila… One of the spongiest, fluffiest cake I have ever made so far.
Looks wonderful, even uniced!
Thanks Don. I have been making this a lot recently and it never disappoints me.