Napa Cabbage Kimchi
This post may contain affiliate links. Please read my disclosure policy for details.
Step by step on how to make traditional Napa Cabbage Kimchi, a staple food that is almost used in every Korean meal as a side dish or ingredient in cooking.

We have grown familiar with kimchi’s strong taste with the rise in popularity of Korean food over recent years. Kimchi played a huge part in Korean cuisine as it is used at almost every meal either as an appetizer, a side dish, or an ingredient for cooking. I still remember I squinted my face when eating this sour and pungent red fermented napa cabbage kimchi for the first time. Once you eat kimchi long enough, you will start to get used to the flavor and become quite addicted.
Although there are many varieties of kimchi, this napa cabbage kimchi or baechu-kimchi (배추김치) is arguably the most common and popular variety. If you love watching Korean dramas or variety shows, you will notice how much Koreans are taking pride and joy in making their own kimchi. Kimchi recipes are passed down through generations. In addition, every Korean household has its own version that greatly varies between regions and social backgrounds. They even create separate refrigerators just for the kimchi to control the optimal temperature at various stages of fermentation.
Nowadays, making homemade kimchi carries the stigma of being difficult. No, it is actually not that cumbersome as it seems as long as you make it in small batches. Koreans have the tradition of making kimchi, which is called kimjang, done together by entire villages and neighborhoods to turn hundreds of cabbages into kimchi. This may be the reason why some people have the perceptive that making kimchi at home tend to be quite laborious because most Koreans usually make a big batch of kimchi in one sitting.
Health Benefit of Eating Kimchi
Kimchi is an amazing superfood that is often overlooked because of its appearance and stinky smell. The fact is kimchi has been named one of the world’s healthiest foods. Kimchi is not only a low-calorie food, but it is also high in fiber and full of nutrients, including vitamin A, B1, B2, C, antioxidants, as well as minerals like calcium, selenium, and iron. Beyond that, it is linked with weight loss, healthy skin, and strong digestive health because of lactobacillus bacteria in it which aid in the body’s digestion process and help to fight off various infections by detoxing the body and eliminating waste as well as aiding in cleaning up the intestines while stimulating better assimilation of nutrients in the body.
Why You Should Try Making Kimchi at Home
For those who like to cook and eat Korean food, kimchi is an essential ingredient for many Korean dishes. You can find many kimchi brands in the refrigerator section at your local supermarket that vary wildly in appearance, texture, and taste. Sometimes I find them tasty to my liking, but others are too salty, vinegary, or sour they will make you pucker. After a series of disappointments, mostly because the store-bought kimchi did not have the taste I wanted, I decided to make my own kimchi.
Price-wise, I find it cheaper to make my own kimchi rather than buy. However, I find it a hassle to gather its ingredients. If you are an avid fan of traditional kimchi like me, you will need to put more effort in understanding and finding these special ingredients like saeujeot![]() (salted fermented shrimp) and gochugaru
(salted fermented shrimp) and gochugaru![]() (Korean red pepper flakes) in Korean supermarket. The upside of making it yourself is that you get to choose the ingredients going into it yourself. You are also in control of a lot more variables like the level of spiciness and fermentation, or even the recipe itself. Getting the right texture and taste to your liking is not an easy task. You need a lot of practice to perfect your kimchi by experience. I recommend to start from this basic napa cabbage kimchi recipe and adjust the recipe to your preference.
(Korean red pepper flakes) in Korean supermarket. The upside of making it yourself is that you get to choose the ingredients going into it yourself. You are also in control of a lot more variables like the level of spiciness and fermentation, or even the recipe itself. Getting the right texture and taste to your liking is not an easy task. You need a lot of practice to perfect your kimchi by experience. I recommend to start from this basic napa cabbage kimchi recipe and adjust the recipe to your preference.
Accordingly, kimchi can be considered as a vegetable probiotic food that contributes to health benefits in a similar manner as yogurt. I find some people get worried over the process of making kimchi at home as it involves many bacteria in the fermentation process. Answering this, kimchi is high in probiotic lactic acid bacteria while the bad bacteria are suppressed during the salting process. Without the presence of bad bacteria, the probiotic in kimchi, lactobacilli, feast on sugars in the vegetables and release CO2 gas and lactic acid as a byproduct. These byproducts are what gives kimchi its sour taste and texture. So, when you find your kimchi jar bubbling of fizzing, do not be afraid because it is a natural occurrence during the fermentation process.
After having both bought and made, I came to the conclusion that if you are willing to sacrifice effort for taste, it is more sensible to make your own kimchi at home, especially if you start adding it to your regular shopping list. If kimchi is just an occasional thing for you, it is worth making the kimchi because a jar will last for a long time in the fridge.
How to Make Napa Cabbage Kimchi
There is no single perfect formula or recipe for how to make kimchi. I believe that every household has its own that no every batch turns out the same. The result might vary based on the water content of the vegetables, the weather, or which salt you use. But more than anything, making kimchi just takes repetition and learning from each batch you make.
1. Cut the cabbage
Firstly, you need to remove the outer layer of leaves and rinse with water. Make a slit at the base of the core and pull apart with your hand to split the cabbage in half. Then, remove the hardcore with a paring knife (you need the leaves still attached to the core) before cutting in half lengthwise again, leaving you with quarters. You can either go to the salting process or cut the cabbage again into bite-sized squares if you like. The kimchi that uses whole cabbage leaf is the traditional style, but it makes more labor-intensive than the bite-sized squares because you will need to spread the spicy paste leaf by leaf.


2. Salt the cabbage
Salting the cabbage is important to let the vegetable rest and draw out its water. If you cut your cabbage in quarters, sprinkle salt between each cabbage leaves. Lift the leaves and concentrate the salt at the thicker stem end of the leaves where they are thicker.
Use the exact amount of salt called for the amount of cabbage you have. The ratio of salt to cabbage is important to kill off any harmful bacteria and leave behind the good bacteria. The good bacteria convert sugar into lactic acid, which gives the kimchi its tangy flavor. Be sure to use non-iodized salt because iodine is capable of killing bacteria and will inhibit the fermentation process.
You can rest the cabbage with salt for 2 to 6 hours depending on which salt or cabbage you use. Flip over the cabbage every half hour to make sure the salt is evenly distributed. For me, 3-4 hours of resting works well (please note that the longer it is salted, the saltier it is). Leave the cabbage until the leaves have wilted and become soft, but still retain the crunch. Be sure to rinse the cabbage in cool water after salting.


3. Adjust the seasoning
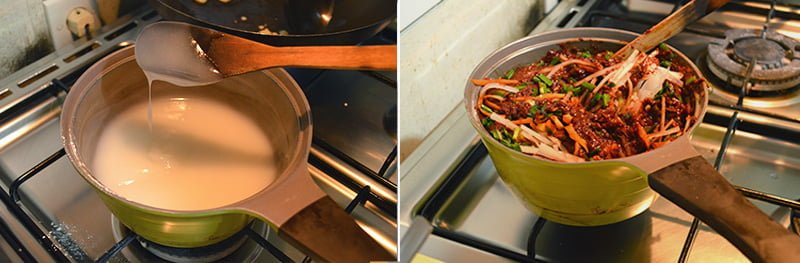
This is where people can get creative. This recipe features a basic traditional napa cabbage kimchi recipe. I use sticky rice porridge that is made from cooked rice flour for thickening the sauce. It helps to distribute the flavor evenly across all the leaves. This porridge is not crucial, but it just helps to spread the flavor better.
To make the seasoning, add garlic, ginger, onion, grated pear or apple, saeujeot![]() , fish sauce into the food processor. Please note not to increase the amount of garlic and ginger because it can make you kimchi bitter and linger more on your breath. Add the mixture into the sticky rice porridge along with gochugaru
, fish sauce into the food processor. Please note not to increase the amount of garlic and ginger because it can make you kimchi bitter and linger more on your breath. Add the mixture into the sticky rice porridge along with gochugaru![]() and other vegetables. Just cut down the amount of gochugaru if you do not like spicy kimchi.
and other vegetables. Just cut down the amount of gochugaru if you do not like spicy kimchi.
4. Mix the seasoning with the salted cabbage
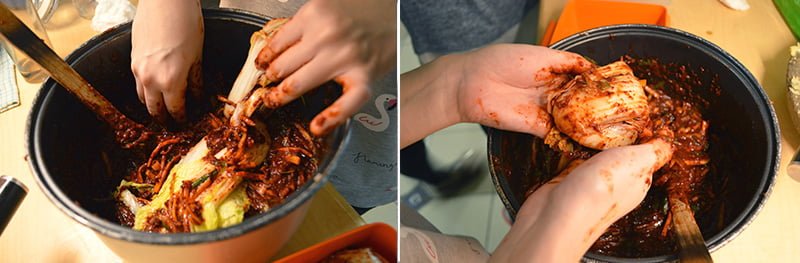
The best way to mix the paste into the salted cabbage is by your hands. Wear gloves if you want, and get every leaf covered in a thin layer of paste. Try to include the raw vegetable between the leaves. Add more paste at the thicker stem end of the leaves where they are thicker. Wrap the cabbage into a bundle and pack it tightly into a container. Press packed bundles down to ensure there are no air pockets or empty spaces in the container.

If you cut your cabbage into bite-sized squares, just toss the paste, mix them thoroughly, pack it tightly into a container.

5. Ferment the kimchi
Ferment the kimchi by leaving it at room temperature for 1-5 days, depending on the temperature and humidity of where it is made. I live in a tropical country where the weather can be pretty hot. I guess that is the reason why the fermentation process only takes just one day. Please take precaution that you could have a bubbling and fizzing kimchi. Having some space on top is important to prevent overflowing kimchi juice in your pantry. This is a normal occurrence as it means the bacteria in kimchi is doing their job. The fermentation of kimchi occurs when good bacteria feast on sugars in the vegetables and release CO2 gas and lactic acid which results in a tangy, crunchy, fresh texture of vegetables.
After fermentation begins, check on kimchi regularly. Using a clean utensil, taste the kimchi every day until it is done. When the kimchi is not fully ripe, you are able to smell and kind of taste the individual ingredients as they have yet to fully integrate with each other. When it is fully ripened, the taste of all the ingredients is well blended together in each cabbage leaf. There is also a light tangy taste and stinky smell that is unique to kimchi.

6. How to store kimchi
Store the fermented kimchi in the refrigerator. The refrigeration slows down the fermentation process. It will continue to age in the fridge, becoming increasingly sour over time. Homemade kimchi can last for several weeks to months as long as it is stored properly. If you do not like the taste of over-fermented kimchi, you might have to discard it after three months.
If you have been leaving kimchi for a long time in the fridge, and much to your horror, there is this white film formed on top, there is no need to get discouraged. The film present on the surface is often not mold but the yeast. You may be able to dispose of this layer and have perfectly good kimchi below the brine. Exposure to oxygen can encourage and allow mold or yeast growth. As long as the brine has enough salt, everything below the brine should still be fine. If the vegetables smell or taste unpleasant to you, just discard everything and try again with a new batch.
Recipes with Napa Cabbage Kimchi
Kimchi is so good for much more than eating straight out of the jar. I love cooking kimchi because the heat will make kimchi caramelize and allow the umami flavors to shine. It is best to use fully fermented, ripe sour kimchi for cooking because it tastes much better for cooking. Here are some recipes with elevating kimchi as the main ingredient.
- Kimchi Fried Rice
- Kimchi Pancake
- Chicken Kimchi Mayo Steamed Buns
- Kimchi Kimbap
- Bibimbap
- Tuna Kimchi Pancakes
Ingredients
- 3.3 lbs (1.5 kg) napa cabbage, about 2 large napa cabbages
- 1/4 cup (35 gr) kosher salt
Rice Porridge Paste
- 1 cup (240 gr) water
- 1 tbsp glutinous rice flour
- 1 tbsp sugar
Seasoning
- 1/4 cup garlic cloves, about 12 garlic cloves
- 1 cm ginger, peeled
- 1/2 onion, roughly chopped
- 1/2 pear or apple, roughly chopped
- 1/4 cup (60 ml) fish sauce
- 2 tbsp saeujeot/salted fermented shrimp
- 1/2 – 1 cup (50-100 gr) gochugaru/Korean red pepper flakes
Vegetables
- 1 cup radish matchsticks, about 1/2 medium radish
- 1/2 cup carrot matchsticks, about 1/2 large carrot
- 4 green onions, thinly chopped
- 1/2 cup chives, cut into 1-inch/2.5 cm pieces
Instructions
Salt the Napa Cabbage
- Remove outer layer leaves of cabbage and rinse with water. Make a slit at the base of the core and pull apart with your hand to split the cabbage in half. Then, remove the hard core with a paring knife (you need the leaves still attached to the core) before cutting in half lengthwise again, leaving you with quarters.
- Sprinkle salt between the leaves. Lift the leaves and concentrate the salt at the thicker stem end of the leaves where they are thicker.
- Let the cabbages rest for 2-3 hours, turn over every 30 minutes until the cabbages turn soft.
- Wash the cabbage under cold running water for a few times to remove the salt. Drain the water.
Make The Rice Porridge Paste
- While the cabbage is salted, heat water, glutinous rice flour, and sugar in small pot until it starts to bubble and thicken. Remove from heat. Cool down completely before using.
Make The Seasoning
- In a food processor, puree garlic, ginger, onion, pear, fish sauce, and saeujeot until blended.
- Pour the fish sauce mixture and gochugaru into rice porridge paste until well combined.
- Add radish, carrot, green onion, and chives into the mixture until well combined.
Mix Seasoning with Salted Cabbage
- Spread a thin layer of the paste on every leaf of salted cabbage. Try to include the raw vegetables between the leaves. Add more paste at the thicker stem end of the leaves where they are thicker.
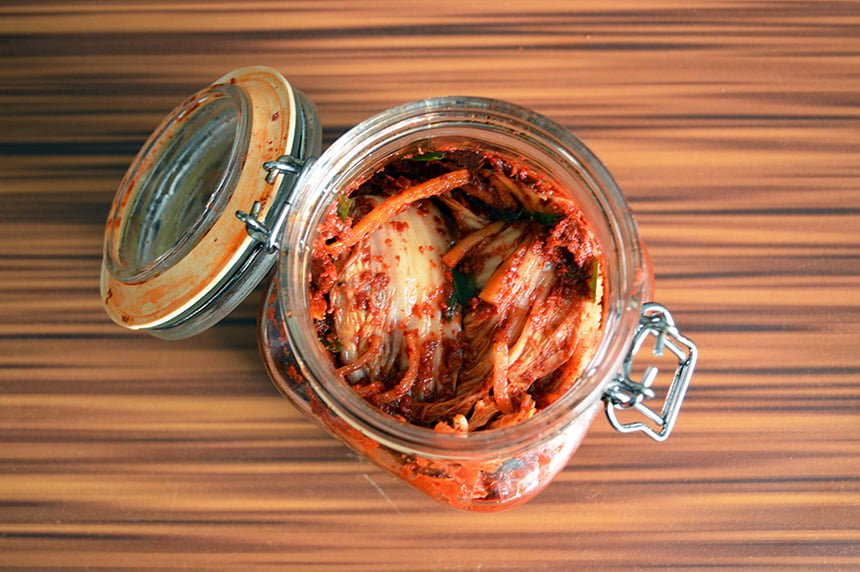
- Wrap the cabbage into a bundle and pack it tightly into a container. Press packed bundles down to ensure there are no air pocket or empty space into a container (leave a little bit of space at the top to prevent overflowing kimchi juice)
Ferment Kimchi
- Leave kimchi in room temperature for 1-5 days, out of direct sunlight. Taste each day to make sure the kimchi is ready. You may see bubbles inside the jar and brine may seep out of the lid.
- When the kimchi tastes ripe enough for your liking, transfer the jar to the refrigerator. Press down on the vegetables with clean spoon to keep them submerged under the brine.


Ik lees jouw recept en vraag mij het volgende af:
Tijdens het fermenteren in de koelkast moeten de groentes onder het pekel water staan. Waar komt dit pekel water vandaan, ik zie nergens een toevoeging staan.
Hello, the water comes out of the vegetables during the kimchi making process. This is caused by salt drawing out moisture through osmosis, creating the brine needed for fermentation.